§ Keep that shadow!
If you’ve ever had to do composite work in Photoshop you’ve no doubt ran into having to use a photo of an object that has a shadow on it. I get this frequently – companies will do nice cut outs of their products and put them on white backgrounds but then throw a drop shadow of one kind or another on it that really interferes with using the image in combination with other images. Masking it is easy, but what if you want to keep that shadow? Do you recreate it? Do you try to extract it and use it? Here is a super easy method of making use of an existing drop shadow in an image.
*Updated 2005/09/25 to include how to keep those black background reflections.
Caveat Emptor
This isn’t a magic way to pull a drop shadow off of a complex background – this is a way to to pull shadows from white background images. The technique can be altered to be used with images that have simple colored backgrounds, but for the most part is limited to white or other plain background images. I’ll show one example of using it on an image that has a simple textured background at the end of the article.
Our starting image
This is an image that I recently used this technique on at work. Its a simple product shot of a WatchGuard Firebox X Peak that has a drop shadow and reflection. While neither are real tough to recreate, why recreate that reflection if you don’t have to? A reflection on an image like this is a bit tedious and time consuming.
Let’s get rolling
The next step is to duplicate your layers. After making a copy, we’ll first set our sights on the top layer. On this layer we’ll cut out the image. Depending upon your intended use, you should mask appropriately. For web images you can fudge it a bit and just use the eraser but for print images you really should take the time and properly mask out the image..
After cutting out the top image, we’ll set the bottom layer’s mode to multiply – the key part to this is that in multiply mode all white areas become 100% translucent to the layer below.
Put a new background under the image and you’re off to the races.
The technique is actually pretty easy but not intuitively obvious.
Variation on a theme
I’ve used variations of this technique with success. This example is of one I put together for a go-karting event.
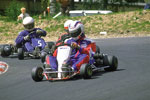
Here is the original image. Its an average photo of a semi-pro go-kart race. Nothing special about it, but it is way too busy for what I want it for. To get a simple, striking header I’ll want to take out everything but the frontmost driver and simplify the background.
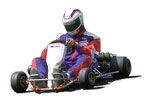
Here is the go-kart image cut out so that all I have is the driver that I want. At this time I’ve got him and his shadow together. From here I’ll make another layer and do the cutout like in the first example. Since this is only a web background I just hacked away with the eraser.
Here is the driver on a simplified background taken from the original image. It does not convey the correct motion for how the driver is pointed but that doesn’t matter once we put text on it. At that point the background will become secondary and barely noticeable.
Here is the image with the driver image, with shadow, placed one layer below, set to multiply and lightened slightly. Since I was able to keep the original shadow I didn’t have to try and make something that looked realistic and that matched the lighting in the photo – the original shadow did that perfectly.
Wrapping up
This technique can be used in a lot of different places and can make for some interesting effects if used (or abused) correctly. The only limit is your original image and how good or how tainted that shadow or reflection is.
*Update: on black backgrounds
So, Gozer asked “What about black backgrounds?”
I say, what about black backgrounds?
The modification to keep reflections from black backgrounds (or any colored backgrounds) is actually pretty easy. While not perfect (it lacks some of that highlight luminosity) it does help keep that air of realism that a faked reflection just can’t match. I’m using an image of everybody’s favorite little gadget: an iPod Nano. I’m pretty sure that the reflection in this photo is faked but I’m gonna use it anyway since it was first one I could find and I’m too lazy to go galavanting around teh intarweb in search of a photo to use.
The difference that we’re going to use is that after we isolate the foreground portion, we’re gonna make another duplicate layer and we’re gonna isolate the reflection. Cut out everything that falls within the reflection area and continue down within the area that the object would reflect if the reflection were stronger – we need some area to fade with.
After that, change the new layer to Overlay mode. If the mask for this layer was a vector mask, rasterize it now. Use the gradient tool, blending from black to transparent on the mask to blend the transitions as needed.
Make that highlight right
The next part gets a bit subjective. Since we apply the refelction as an overlay layer we don’t quite get the bright areas that we need to be convincing. For this I duplicated my original layer and lightened it to enhance the reflections. I then used Select: Color Range to get the areas of the reflection that I felt were important to the realism and filled them with white on a new layer.
This new layer was moved to be inbetween the main image (the full strength image we knocked out first) and the reflection layer. I ended up using the layer in normal blending mode at 30% opacity to help pull out the hightlights in the reflection. The results are very acceptable. Depending upon the needs of the image this step should be examined closely and worked on not to match this tutorial but to match the image at hand. It will vary wildly.
Another conclusion
So, while neither one of these techniques will work 100% of the time they form a basis of how to deal with preserving shadows and reflections in images. Sure beats buying a copy of Extensis Mask Pro or Procreate (Corel) Knockout (which I have and find more cumbersome that it is worth).
Who knows, maybe Nanos can levitate over water…
Tagged as: background mask photoshop shadow tutorial


